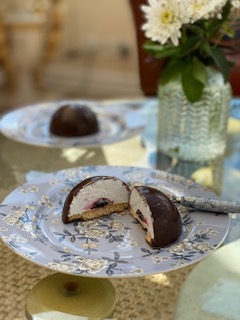
Chocolate Teacakes
These nostalgic little treats are adored by young and old alike. Thin shiny chocolate shell, soft vanilla marshmallow, jam surprise and crisp chocolate covered digestive base. I use my gf digestive biscuit recipe – just perfect. Make the biscuits a day or two before if you prefer. They will keep for up to a week in a tin.
Preparation
For the biscuit
Mix all the dry ingredients together in a mixing bowl then rub in the butter as you would for pastry. Then add the maple syrup and sufficient milk to form a stiff dough.
Between two sheets of plastic (eg. Cut across the bottom and one side of two freezer bags so that you have two large plastic sheets), roll out the dough to 3mm thickness. Slide and transfer the dough once rolled out onto a baking sheet then into the fridge to chill for about 10 minutes still enclosed between the plastic sheets. Take from the fridge, peel off the top layer of plastic then using a 6cm cutter cut out your biscuits, rerolling as necessary.
If the dough gets sticky simply pop it back into the fridge for 5 minutes to firm up.
Transfer your biscuits onto a baking sheet lined with baking parchment. Prick the biscuits with a fork then place in the fridge until the oven heats up. They need to chill for about 15 minutes.
Heat the oven to 175 degrees then bake the biscuits for 8-10 minutes until just starting to colour. Transfer to a wire rack to cool.
For the teacake
Start by melting the chocolate. Break up the chocolate and place in a bowl over a pan of barely simmering water. I boil the water, turn off the heat then place the bowl over the top. The chocolate will melt in 5 minutes or so.
Transfer about 1.5 tablespoons of melted chocolate into the base of each of the silicone cups. Don’t grease the mould because the chocolate will not adhere.
Tilt the mould from side to side to coat the sides then use the back of a teaspoon to spread the chocolate into any areas not covered and to smooth the chocolate away from puddling at the base of the mould.
Transfer to the fridge to set.
To make the marshmallow : Use the same pan of hot water used for melting the chocolate. Bring to the boil again then turn down to a simmer. Place the egg whites and sugar in a bowl and stand over the hot water. Stir all the time with a hand whisk until the sugar dissolves and when you rub the mix between thumb and forefinger there is no grittiness.
Using an electric hand whisk then whisk up the sugar and egg white until starting to thicken. Take the bowl off the heat and place onto a work surface covered with a cloth so that the bowl doesn’t slide around.
Tip the hot water from the saucepan and drop into it, whilst the pan is still hot, the soaked gelatine leaves.
(Lift the leaves from their cold water, they will be soft and wobbly and dripping with water. Pop them into the pan and swirl them around. There will be enough residual heat to dissolve them in 20 seconds or so. You will see in the base of the pan a thin syrup.)
Pour this liquid gelatine, (scraping every last drop using a plastic spatula) into the warm sugar and whisked up egg whites and continue to whisk then until cool. The mix will thicken and once cool transfer to a reusable piping bag or use a spoon to fill the chilled chocolate shells.
Fill to within about 1/3rd inch of the top then use the back of a teaspoon to make a small hollow in the marshmallow. Spoon or pipe ½ tsp jam into the hollow.
Place a digestive biscuit, presentation side down and flat side up onto the marshmallow and make sure the top of the biscuit is in line with the line of the silicone mould.
Spoon over a tablespoon of melted chocolate over the top then smooth across with an angled palette knife.
Transfer to the fridge to set for at least two hours.
Pop out of the moulds and serve these shiny gems !!
< Back to Recipes


